What Are Black Triangles Between Your Teeth?

Published on: 15 October 2022 Last Updated on: 18 October 2022
What Causes Black Triangle Teeth

Celebrities with bright smiles are now more popular than ever, which may lead people to start noticing their teeth’s cosmetic problems. Black triangle teeth are one of the most common dental problems people don’t address or pay attention to.

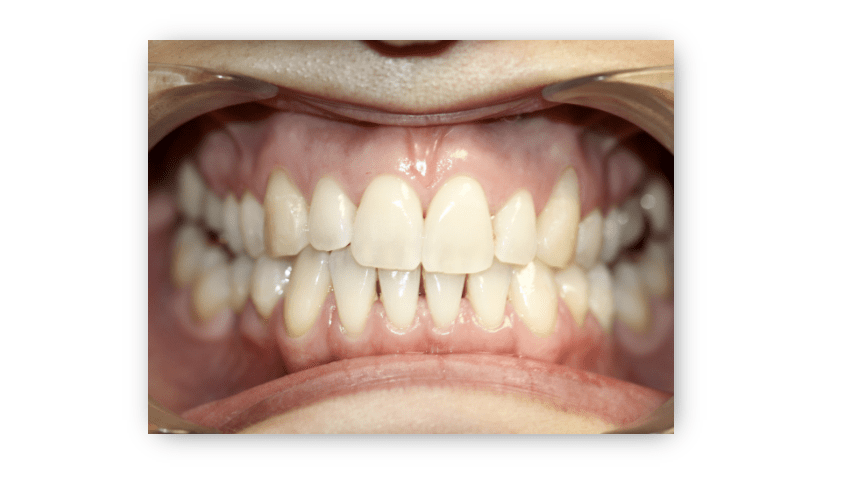
You can check for yourself if you have black triangles between your teeth. Smile with your teeth exposed in front of a mirror. If you can see any black areas between your gums and teeth, you have black triangle teeth or gingival embrasures.

They are initially harmless, but they can be dangerous if not treated immediately. It’s important to understand how they develop and what you can do to treat them.

What Are Black Triangle Teeth?

These black, triangle-shaped gaps between your gums and teeth are known as open gingival embrasures. They are usually associated with dental habits, age, and bone injury. They are also called black triangle teeth, which occur when your teeth and gums don’t fill the gaps between them.

Black triangles between teeth are a common problem; nearly 76% of adults over 20 have black spaces between their teeth, according to a study. 

Food debris and plaque can accumulate in these gaps, making teeth susceptible to cavities and gum infections. The risk increases the more a person doesn’t practice good oral hygiene. Most want to fix them for cosmetic reasons and to keep their teeth and gums healthy.

What Causes Black Triangle Teeth?

Black Triangles

It is important to see your dentist immediately to discuss how to treat this condition. They will use your dental history and the cause of your black triangle teeth as their guide in recommending treatments that best address it.

According to sunrise-dentistry.com, some of the reasons black triangle teeth occur are:

1. Receding Gums

Gum disease, infections, age, and smoking can lead to gum recession and thinness. Bacteria exposure and tooth decay can lead to cavities and other infections. Getting help immediately from a dentist is important if you find gaps between your teeth, regardless of their size.

2. Aggressive Dental Hygiene Techniques

Brushing or flossing too hard can damage the tissues between your teeth. Using a toothbrush with the right head size is also important; a toothbrush with a large head can make the gaps between your teeth larger.

3. Fragile Gum Tissue

Every person’s gum tissue thickness and stability are different. Experts believe that thinner gum tissues are less resistant to dental procedures. If you have fragile gum tissue, getting fullness back after dental implants will not be easy.

4. Teeth Shape

Apart from the gum thickness, each person’s tooth shape also differs. A person with triangular-shaped teeth is more likely to develop black gaps. Their teeth have wider biting surfaces than their bottom part near the gum line.

5. Mistakes During an Orthodontic Procedure

Black triangle teeth and other dental conditions can develop when an orthodontic procedure goes wrong. Small gaps can also form when teeth shift into new positions. You may need to repeat your dental treatment or visit a more reliable dentist.

How To Get Rid Of Black Spaces Between Your Teeth?

Now that it’s clear that the black gaps between your teeth are not just cosmetic issues, it’s best to learn how to eliminate them.

Consult your dentist before making any changes in your lifestyle or treatment for your dental health. They can help you understand the nature of your dental condition and determine the best approach to manage them.

According to the British Dental Journal’s study, patients have several treatment options for the black triangles between their teeth.

  • Safe surgical techniques like pinhole surgery repair and tissue transplantation to preserve gums
  • Tissue engineering, where dentists use regenerative cells to restore gum tissue
  • Hyaluronic acid treatment to reduce black gaps between teeth and volumize gum tissues
  • Using prosthetics made of composite or porcelain with a pink shade to bond teeth and conceal the appearance of black triangles between teeth
  • Installing a removable gingival cover to close the triangle spaces between the teeth
  • Repositioning or reshaping teeth to reduce or eliminate the black spaces between them

Proper Dental Hygiene and Black Triangle Teeth

Brushing and flossing your teeth every day will help prevent gum disease, blackening of your teeth, and other serious conditions. Routine dental checks help you know how your lifestyle choices impact your dental health and help your dentist check for early signs of dental problems.

The American Dental Association has developed guidelines for how to brush your teeth and perform interdental cleaning. They also recommend using a toothbrush with soft bristles.

Key Takeaway

The black triangles between your teeth are more than just a cosmetic problem. They are caused by oral health problems like receding gums, aggressive oral hygiene techniques, and fragile gum tissue. Mistakes during an orthodontic procedure and the shape of your teeth may also cause black triangles between your teeth.

You should consult your dentist about them; they are the best people suited to help you determine the best course of action to take. They can also address the dental problems causing the black triangles between your teeth.

Additionals:

Content Rally wrapped around an online publication where you can publish your own intellectuals. It is a publishing platform designed to make great stories by content creators. This is your era, your place to be online. So come forward share your views, thoughts and ideas via Content Rally.

View all posts

Leave a Reply

Your email address will not be published. Required fields are marked *

Related

Laser Hair Removal

The Ultimate Guide To Choosing A Professional Laser Hair Removal Machine

In today's fast-paced world, the demand for professional laser hair removal services has surged. People are increasingly looking for a long-term solution to unwanted hair, and professional laser removal of hair has emerged as a popular choice. If you're considering entering the beauty industry or upgrading your salon's services, it's crucial to understand the ins and outs of professional laser hair removal machine canada. In this comprehensive guide, we'll walk you through everything you need to know about these devices, from how they work to choosing the right one for your business. What Is Professional Laser Hair Removal? Understanding the Basics The professional trick of hair removal with the use of a laser is a non-invasive cosmetic process. It makes use of concentrated beams of light that further target and eliminate undesired hair from the body. It offers a long-lasting solution to hair removal by targeting hair follicles without damaging the surrounding skin. How Does it Work? This section will delve into the science behind laser hair elimination, explaining the process of targeting melanin in hair follicles to inhibit hair growth. Advantages Of Professional Laser Removal Of Hair Why Choose Laser Hair Removal? Highlighting the benefits of laser removal of hair, including precision, reduced discomfort, and long-lasting results. Safety and Effectiveness Discussing the safety measures and the effectiveness of professional laser hair elimination when performed by trained technicians. Types of Professional Laser Hair Removal Machines Diode Laser Explaining the Diode laser technology, its advantages, and suitable candidates for this type of machine. Nd: YAG Laser Discussing the Nd: YAG laser and its suitability for various skin types and hair colors. Factors To Consider When Choosing A Laser Hair Eliminating Machine Budget Guidance on budget allocation and finding the right balance between cost and quality. Machine Specifications Explaining the importance of machine specifications, including wavelength and energy output. Certification and Training Emphasizing the need for proper certification and training for technicians. Setting Up A Professional Laser Hair Removal Business Legal Considerations Highlighting the legal requirements for operating a laser removal of hair business. Marketing Strategies Tips on marketing your laser hair removal services to attract clients. Maintenance And Safety Machine Maintenance Explaining the importance of regular maintenance to ensure optimal performance. Safety Measures Discussing safety protocols to protect both clients and technicians. In conclusion, professional laser hair removal machines are a valuable addition to any beauty business. They offer effective, long-lasting results, and with the right knowledge and equipment, you can provide top-notch services to your clients. Remember to choose your machine wisely, invest in training, and prioritize safety. Read Also: 6 stunning long hairstyles for oval faces A Brief Guide On Applications of Spray Dryers

READ MOREDetails
Acne

The 5 Best Herbal Remedies to Treat Acne

One of the most prevalent skin conditions affecting both men and women, acne affects a whopping 80% of people at some point or the other in life. It starts when the naturally occurring pores in the skin get blocked with oil and worn-out skin cells. Deposition of extra sebum in the pores causes growth and build-up of bacteria, eventually leading to inflammation and subsequent redness and irritation. Conventional treatments for acne are sometimes harsh and sometimes ineffective. Hence, relying on natural remedies is your best bet. Acne is one of those things that can appear anywhere, from your face to your legs. Even having acne on your tushy is not an uncommon problem, especially if you are a very active person. Sweating triggers a lot of skin imperfections, that's why being able to fight these blemishes has triggered many companies to sprout solutions for us with creams and face washes. Here, we take a look at the top 5 herbal remedies for acne  1. Apply Tea Tree Oil A powerful essential oil derived from the leaves of a small tree originating in Australia, tea tree oil is famous for its ability to combat bacteria and tone down skin inflammation. Furthermore, several studies have shown that applying approximately 5% tea tree oil on the skin reduces acne effectively. As compared to the same concentration of benzoyl peroxide, 5% tea tree oil does not act as quickly. However, it is still just as effective and can improve acne significantly within three months of repeated usage. Since tea tree oil is super potent, it's advisable to dilute it before application; else you may suffer from side-effects like irritation, dryness, and burning. You can search for the best tea tree oil in the market here. Steps to Use Tea Tree Oil Combine nine parts of water with 1 part of tea tree oil in a bowl. Then dip a cotton ball into the mixture and dab it properly all over the area of acne breakouts. Apply some moisturizer to ease any irritation. Repeat the procedure once or twice a day, or whenever you get the pimples 2. Apply Green Tea Green tea is enriched with high levels of antioxidants, flavonoids, and tannins. These compounds can help combat bacteria, reduce inflammation and promote good health in general. Consequently, it nourishes your skin and makes it less susceptible to developing acne. The primary antioxidant of green tea is epigallocatechin-3-gallate, which has proven efficacy in controlling sebum production, fighting inflammation and eventually inhibiting the growth of acne. Steps to Use Green Tea  Steep a packet of green tea in hot/ boiling water for 3-5 minutes. Allow the tea to cool down. Dip a cotton swab into the tea and apply it all over your skin. Alternatively, you can pour the tea into a spray bottle and spray it on your skin. Let it dry and then rinse off the water. Pat your face dry. If possible, add the leftover tea leaves to honey for making a moisturizing face mask. Remember, in addition to applying green tea on your skin; you can also drink it daily to achieve beneficial results, especially in terms of acne removal. Drinking green tea helps in the lowering of insulin level and blood sugar, both of which can lead to the formation of acne. 3. Apple Cider Vinegar Prepared by fermenting apple cider, apple cider vinegar is a powerful elixir with proven efficacy in fighting several different types of bacteria and viruses. It contains numerous organic acids that have been known to kill acne. For example, succinic acid has been proven in its role of suppressing inflammation. Similarly, high levels of lactic acid in apple cider vinegar have also been shown to reduce the severity of acne breakouts. And what's best is that apple cider vinegar can even help to dry up excess oil, leading to a reduction in acne formation in the long run. Steps to Use Apple Cider Vinegar Combine one part of apple cider vinegar with three parts of water. Consider using more apply for extra-sensitive skin. After cleansing thoroughly, apply the mixture on your skin gently with a cotton swab. Let it stay put for a few seconds and then rinse off with water. Pat dry gently. Repeat the process daily, or as needed. Remember, you should always dilute apple cider vinegar before applying it on your skin as it's very harsh and could lead to irritation and burns when applied in the concentrated form. 4. Cinnamon & Honey Mask Cinnamon and honey are both powerful sources of antioxidants. According to several studies, increasing antioxidant supply to the skin is important for reducing acne, and apparently, shows better results than applying retinoid and benzoyl peroxide. Just so you know, the latter two are common, anti-bacterial medications for acne-prone skin. Due to the presence of an overwhelming amount of vitamin B3, linoleic fatty acid, sodium ascorbyl phosphate and vitamin C extracts, both honey and cinnamon can reduce inflammation and fight bacteria, thereby nullifying the two leading causes of acne. Steps to Prepare a Honey & Cinnamon Mask Mix a teaspoon of cinnamon and two tablespoons of honey to form a smooth paste. Clean your face with a mild face wash and apply the mask on your face. Let it stay put for 10-15 minutes. Rinse off the mask completely and pat your skin dry with a soft towel. Repeat the process every week to observe good results 5. Apply Witch Hazel Derived from witch hazel shrub, this popular North American plant contains tannins that are known to have potent antibacterial and anti-inflammatory action on the skin. It is used to treat a wide range of skin ailments, including eczema, dandruff, bruises, insect bites, burns, and acne. Several studies have proven that applying witch hazel on the skin can combat bacteria, lower inflammation, and promote the well-being of the skin. Steps to Use Witch Hazel  Mix a cup of water and a tablespoon of witch hazel bark in a saucepan. Immerse the witch hazel bark for half-an-hour and allow the mixture to boil for some time. Then reduce the flame and cook it covered for 10 minutes. Let the mixture cool down for another 10 minutes. Strain and keep the liquid in an airtight container. Apply on clean skin with a cotton swab once or twice a day Ending Note In conclusion, we would like to stress on the importance of natural and herbal remedies for treating acne from scratch. This is one of the most common skin conditions with a wide range of underlying causes, some of which are unidentified to date. Conventional treatments tend to cause dryness, irritation, and redness. However, natural remedies beg to differ. The herbal remedies listed above may not work for one and all, but they are surely worth giving a try! Read More: The Relationship Between Oral Health And General Health Top 5 Foods For Healthier And Thicker Hair 5 Protein Enriched Food To Improve Mental Health E-Cigarettes: How They Effect On Your Oral Health

READ MOREDetails
Classy Makeup

Simple But Classy Look Make-up

If you're looking for a simple but classy makeup look, there are a few steps to follow that will help you achieve just that. Whether you want to adopt a basic and elegant look for a special occasion, such as an engagement, wedding, reunion, or another occasion, there are certain guidelines that will help you achieve a sophisticated look for almost any event. Here are some basics to get you started. In the following section, we speak to leading experts at the Paris Lash Academy and ask them about the best simple and classy make-up looks that you can opt for. Paris Lash Academy offers various eyelash extensions that can complement your looks. Simple But Classy Makeup Look: Makeup Brushes: Before you get started on your simple but classy makeup routine, be sure and gather a set of quality makeup brushes to speed up the process. You'll likely need foundation, blush, eyelid, powder, and contouring brushes. You might also want to think about including a few beauty blenders, particularly for foundation, blush, and contour application. You want a smooth application and the right brushes and blenders can provide that. Prepping Skin: In order for makeup to blend as it should, cleanse your skin to create a slight exfoliating effect before any makeup is applied. Once cleansed, moisturize the face and apply a face and eyelid primer. Primer applications should smooth and preserve any makeup that is applied to those areas. Evening out Skin Tone: If the skin is blotchy or uneven, the application of a sheer tinted moisturizer will help to smooth and even out skin tone. Tinted moisturizers can also add warmth to the complexion. You don't have to go for an exact skin match with a sheer tint as you can still bring an added intensity or glow to the skin. If your skin is extremely oily, you'll probably want to skip the tinted moisturizer step to avoid oil buildup. Concealing Under-Eye Circles and Blemishes: Evening out skin tone also means including and using a good concealer that is rich in pigment and staying power. You want to cover dark under-eye circles and other blemishes. Using too much will accentuate problems, so simply use a short swiping motion under the eye. When dispensing the concealer, place it in a triangular shape under the eye. Blend the area with your finger or a beauty blender. For blemishes, dab the actual spot and blend. Continue to do the same action if added coverage is necessary. You want the concealer to be at least one to two shades lighter than your skin tone. Other spots to highlight include going up the bridge of the nose and on up to the forehead. Foundation: The right foundation is the piece de resistance of any makeup routine. You want to find a shade that is closest to your actual skin tone and decide whether a liquid or cream is suitable for your skin type. For a more flawless look, use a beauty blender to apply the foundation. It will definitely deliver a smoother and more complete coverage. Blend the foundation on the face and continue down onto the neck area. If necessary, use your concealer again to cover any blemishes or dark areas, or to add further accents. Contouring/Highlighting: Once the foundation phase is complete, use a contour brush to apply contour powder or cream under the apple areas of the cheeks. Also, apply that same contour to the forehead area and both sides of the jaw. In order to add more warmth, apply a bronzer to those same areas. Blush Color and Highlighter: For added color, choose a blush color for a simple but classy makeup look. You want to think about using cream blushes in warm peaches and pinks so that skin is given a natural and subtle look. Forego cool pinks as they add too much drama. Natural cheek colors can convey a blushing bride kind of appearance that can enhance just about any luvbridal wedding ensemble as well as any other special occasion or event. Use a blender or brush to apply blush to the apples of the cheeks. For more cheek and face enhancement, add a non-sparkly highlighter to the tip of the nose and cheek areas and anywhere else where the sun would normally hit. Again, use a beauty blender to smooth out both the blush and highlighter to create a more subtle and simple effect. Eye Shadow, Liner, Mascara, and Eye Pencils: Soft browns are the best eyeshadow colors to use to enhance the eye area and its shape. Select a shade that is a bit darker than your skin. Brush and blend the shadow into the creases of the eye as well as on the lower lashes. Keep it soft with no hard lines. Add a neutral creamy color shadow at the inner corners of the eyes as well as at the center of the lids, and on the brow bones. At the outer corners of the eyes, use a darker shade to bring a further dimension to the eyes. Liner - Apply a dark brown or black liner to the eyelids. Liquid and gel liners give a longer, starker and lasting effect while pencils usually bring a softer and smoother look. Mascara - provides a finishing touch to the eye area. Apply several coats to the top lashes. For lighter lashes uses brown mascara and if you have darker lashes, use brown or black. Avoid mascara products that produce spidery lengths to lashes, as they can detract from a more natural look. Mascara can also be used on your bottom lashes by applying a bit of mascara from the wand and placing it right at the roots of the bottom lashes using a small eye brush to dot in the mascara. Eyebrow pencil/gel - color choices should be one or two shades on the darker side for blonde or light brown hair, while one or two shades lighter for dark or black hair. You want your brows to be natural but you also want them to be defined. Use an eyebrow template if you are not sure of how to color in your brows or simply need a guideline for correct color placement. Think soft and subtle, yet defined. Lips: You want to enhance your lips with a pretty lasting tint rather than an outlandish and garish color. Choose a shade that actually matches your true lip color and pat or press the color into the lips. Go to the center of the lips first and blend the color in an outward motion. Darker berry colors and reds are flattering in a matte tint as they do bring emphasis to the lips without exaggerating them. Powder: Maybe you don't require powder to finish your look but if your skin has a tendency to get oily and produces shiny spots, you might want to think about an oil-absorbing powder. Powders that are pressed, silk, airbrushed, translucent, and hydrating are great for completing any look, whether your skin is oily or otherwise. These powders are easy to use as you can just sweep a powder brush across them and buff the skin to create a perfect look, which includes powdering the under-eye area as well. Pores and blemishes are also reduced with the use of this kind of powder, and touch-ups are easy as the buildup is almost nonexistent. Setting or Fixing Spray: Once your makeup is completely done, use a setting or fixing spray to hold your work of art in place. Whether you choose it in spray, powder, or mist form, it is designed to maintain your makeup for a number of hours to all day. It helps you avoid those frequent powder room touch-ups that are annoying and a hassle. There are specific types to use for both oily and dry skin. Creating a simple but classy makeup look can be fun and enhancing and if you have a few steps to follow, the process isn't then difficult. Take a look at the steps here and give yourself a simple but classy makeup makeover. Just remember not to overdo it. A Simple Professional Makeup Routine for Everyday   Sometimes all we need is simple classy makeup to put yourself together before your office.  Creating a polished look for the office doesn’t have to be time-consuming. With a few straightforward steps, you can achieve a clean and classy makeup look that’s ideal for work.  Start with a Clean Slate  Your face is the canvas, and a clean slate is the beginning step of a well-set makeup.  Therefore, begin by thoroughly cleansing your face to remove any impurities.   Apply a lightweight moisturizer to hydrate your skin, followed by a primer to ensure your makeup lasts throughout the day.  Achieve an Even Complexion  The second step is getting an even complexion. This will be the base of your minimal makeup. Half of the time, getting an even tone can already make you feel put together.  Select a light foundation or BB cream (if you do not want something heavy like foundation) that closely matches your skin tone.   Blend it evenly across your face using a beauty blender or brush, focusing on areas that need extra coverage. For blemishes or dark circles, gently apply concealer and blend it in seamlessly.  Enhance Your Natural Glow  Too much bold makeup can make you stand out in all the wrong ways when you are in the office.  So, if you are in love with the heavy sun-kissed look, it is time to keep that overwhelming rouge down.  Rather, choose a soft pink or peach blush to add a subtle pop of color to your cheeks.   Lightly contour under your cheekbones and along your hairline with a matte bronzer. Finish by applying a touch of highlighter to the high points of your face, such as the tops of your cheeks and the bridge of your nose.  Subtly Define Your Eyes  Again, do not go for a bold eye look. Reserve them for the evenings. But here is how you can define them with the help of counting.  Go for neutral eyeshadow shades like soft browns or taupe. Apply a lighter shade across your lids and blend a slightly darker shade into the crease for depth. Use brown or black eyeliner to line your upper lash line and finish with a coat of mascara.  Perfect Your Brows  Sometimes, all you need is a well-set brow, and your makeup and your face have an automatic symmetry.  Fill in any sparse areas of your brows with a brow pencil or powder, maintaining a natural look. Follow the natural shape of your brows without making them too bold.  Finish with a Soft Lip Shade  Finally, it is time to seal the makeup with lips.  For a natural and professional look, you can opt for a simple lip gloss or balm. Try not to go overboard with the clear gloss, as it can cheapen your look at times.  Select a lip color that enhances your natural lip tone, such as a nude, pink, or soft berry shade.   Apply it evenly, and if you like, add a layer of gloss for a polished finish.  Read Also: 7 Tips For People With Hypersensitive Skin Expert Doctor’s Treatments For Cystic Acne 7 Anti-Aging Tricks And Tips To Get Youthful Skin Like A Teen Get Part Ready In No Time With These Hair And Makeup Hacks!

READ MOREDetails